Website Hooks can be used by developers as a simple way to get a Web Service notified of real-time events occurring on a Crisp website. For instance, you may want to get your backend notified of messages sent by your website visitors, in real-time.
This guide explains how Website Hooks work, and how to setup them. Website Hooks are available to all Crisp users, whether free or paid.
Introduction Video
What do Web Hooks do?
Website Hooks can be used to integrate with Crisp, and receive real-time events from Crisp on a custom HTTP endpoint, ie. on your own servers.
This can be used in the following scenarios:
- Store received & sent message history in your database
- Store user emails right when a visitor sets their email from the chatbox
- Do something when a visitor visits your website eg. send a message to this visitor, from your own backend
- Etc. (you may come up with other scenarios)
How to Setup Website Hooks?
Website Hooks are available from any Crisp plan, including the Free plan.
1. Prepare the receiving endpoint
To setup Website Hooks, you first need to setup a public HTTP endpoint, handling HTTP POST payloads. The endpoint can listen on any domain name / URL and can be hosted on your own servers.
To ensure no external user/attacker can post fake Crisp events to your endpoint URL, it is recommended you append a key to the endpoint URL, as an URL parameter, eg. https://endpoint.example.com/crisp/hooks?key=KEY. Your backend can then check that the provided key parameter matches the configured security key. Indeed, Website Hooks are not signed, in contrary to Plugin Hooks.
2. Add your endpoint to Crisp
Once the endpoint is ready, create the Website Hooks configuration in Crisp:
- Go to your website settings on your Crisp Dashboard
- Pick the target website you need to use the Web Hooks feature on
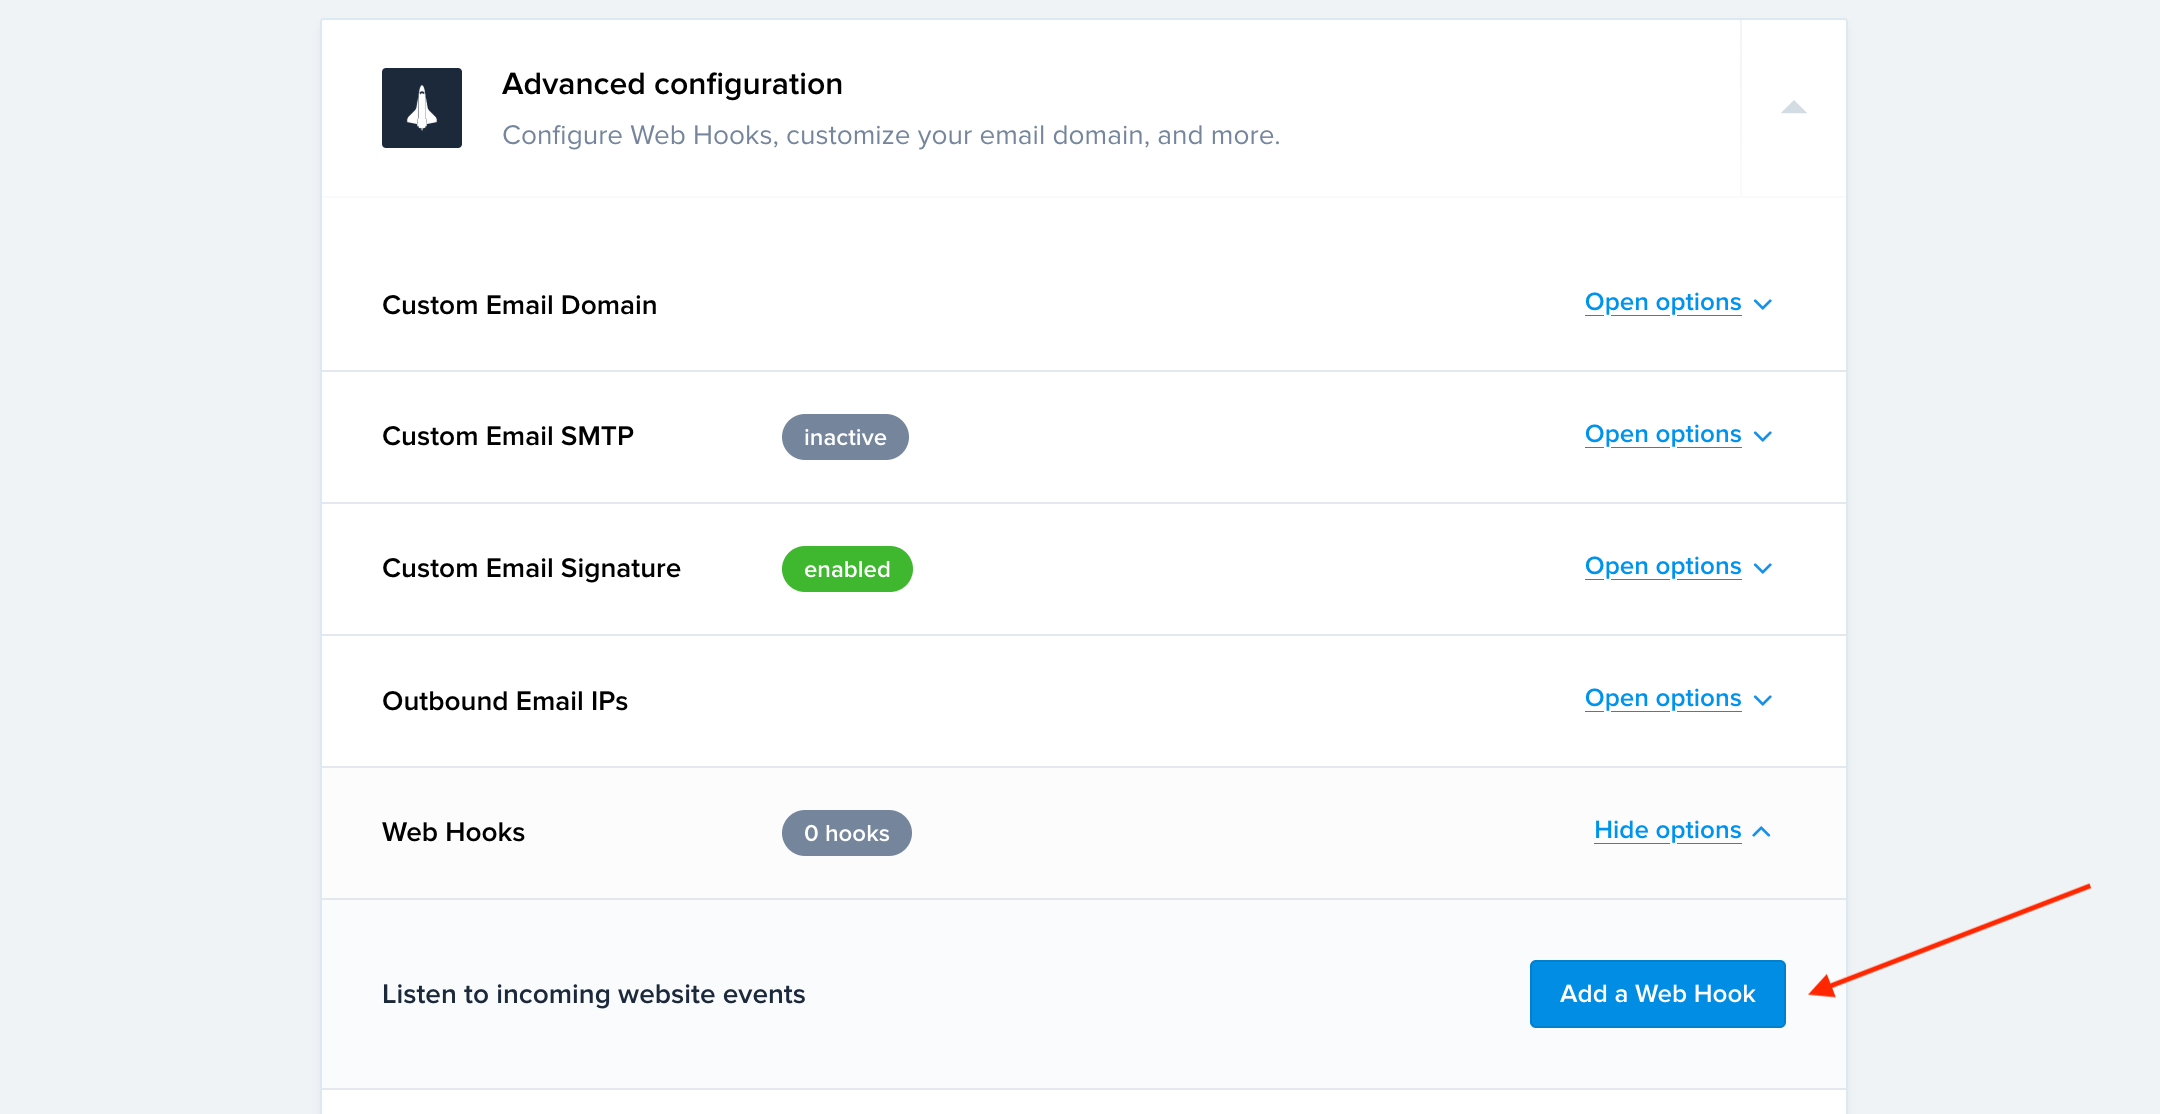
- Scroll down, and open Advanced configuration, then select Web Hooks
- Click on Add a Web Hook
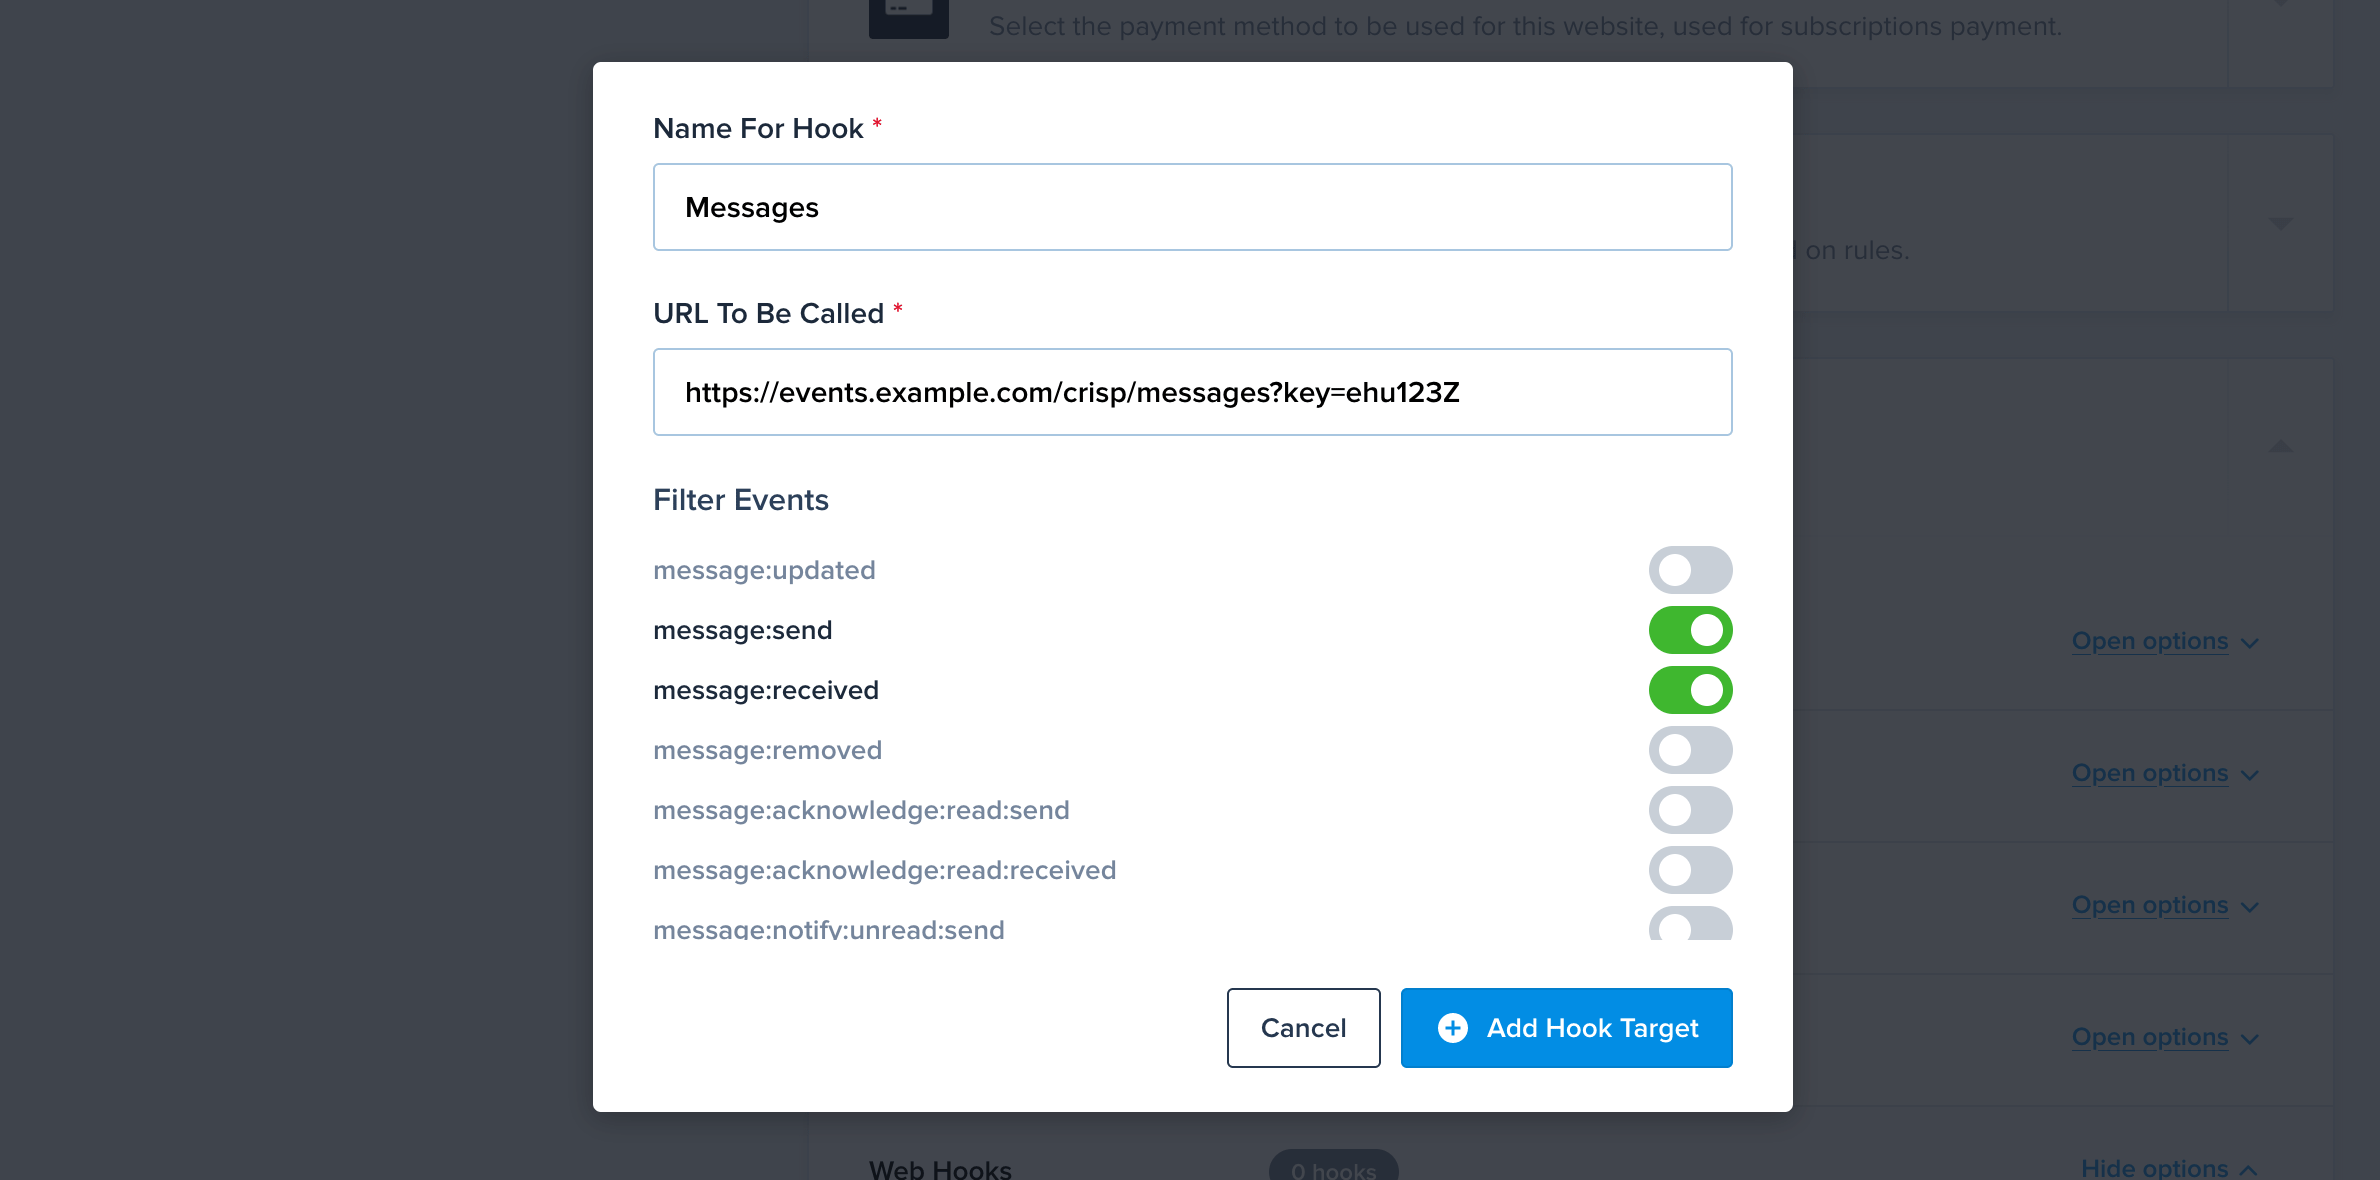
- Enter a name for your Web Hook, an endpoint URL (eg.
https://endpoint.example.com/crisp/hooks?key=KEYas described before) - Pick a list of events you wish to receive on the URL. Select at least 1 event. It is recommended you pick only the desired events (you can edit it later)
- Click on Add Hook Target to create the Web Hook. Selected events will now get delivered to the endpoint URL


3. Check your new Web Hook
Now that your Web Hook is created and running, it's time to confirm it works properly.
When Crisp sends an event to your Web Hook endpoint, it considers any HTTP 200 to HTTP 299 reply as successful. Other status codes are considered as failed (even redirect statuses).
To make it easy for you to debug, Crisp logs the status of the last call to your Web Hook (whether it succeeded or failed). You can check it out by refreshing your settings and opening the Web Hooks list again (see examples below).


How to Handle Web Hook Events?
Web Hooks events come when a real-time event occurs in your Crisp website. Event payloads have the same data format as the RTM API.
Web Hook general format
A Web Hook HTTP POST body is JSON-encoded and formatted as such:
{
  "website_id" : "website_id",  // The Website ID the event occurred in
  "event"      : "event",       // The event namespace (see list of events below)
  "data"       : "payload",     // The Web Hook payload (format depends on event namespace)
  "timestamp"  : "timestamp"    // The UNIX timestamp of the event (in milliseconds)
}
Web Hook example
For instance, a Web Hook on a visitor text message (message:send) may come on URL https://endpoint.example.com/crisp/hooks?key=a2sDx_1 with body:
{
  "website_id": "42286ab3-b29a-4fde-8538-da0ae501d825",
  "event": "message:send",

  "data": {
    "website_id": "42286ab3-b29a-4fde-8538-da0ae501d825",
    "session_id": "session_36ba3566-9651-4790-afc8-ffedbccc317f",
    "type": "text",
    "content": "Hey :)",
    "from": "user",
    "origin": "chat",
    "stamped": true,
    "timestamp": 1506985696616,
    "fingerprint": 150698569649423,

    "user": {
      "nickname": "visitor493603",
      "user_id": "session_36ba3566-9651-4790-afc8-ffedbccc317f"
    }
  },

  "timestamp": 1506985696616
}multipart/form-data, they require to be parsed as a raw JSON input.Parsing Web Hooks in PHP
Web Hooks can be parsed in PHP in a few lines of code:
// This is the received raw event
$inputJSON = file_get_contents('php://input');

// Decode this event as a PHP array, and show its contents
$input = json_decode($inputJSON, TRUE);

var_dump($input["data"]);
Which Events Can I Receive?
You can find a list of events that can be handled, as well as examples, in the Web Hooks Reference. Look for Website Hooks in the support matrix.
Troubleshooting
If the last call to your Web Hook failed, or if you don't receive Web Hooks events, check the following:
- Is your SSL/TLS certificate valid? (not expired, and matching the domain name)
- Does the receiving server reply with a
200status code? - Does the receiving server reply fast enough? (ie. less than 2 seconds)
Feel free to chat with us if you have any question, or if you cannot solve your issue. We'll gladly help you.