To start receiving events from Crisp websites subscribed to your integration, the RTM API needs to be connected to over a single WebSocket channel, via the Socket.IO protocol.
The channel will be silent until you send the first authentication payload, with your authentication token. Once authenticated, events will start flowing, until you explicitly teardown the channel.
This guide walks you through setting up a connection with the RTM API, and receiving events.
Overview Schematic
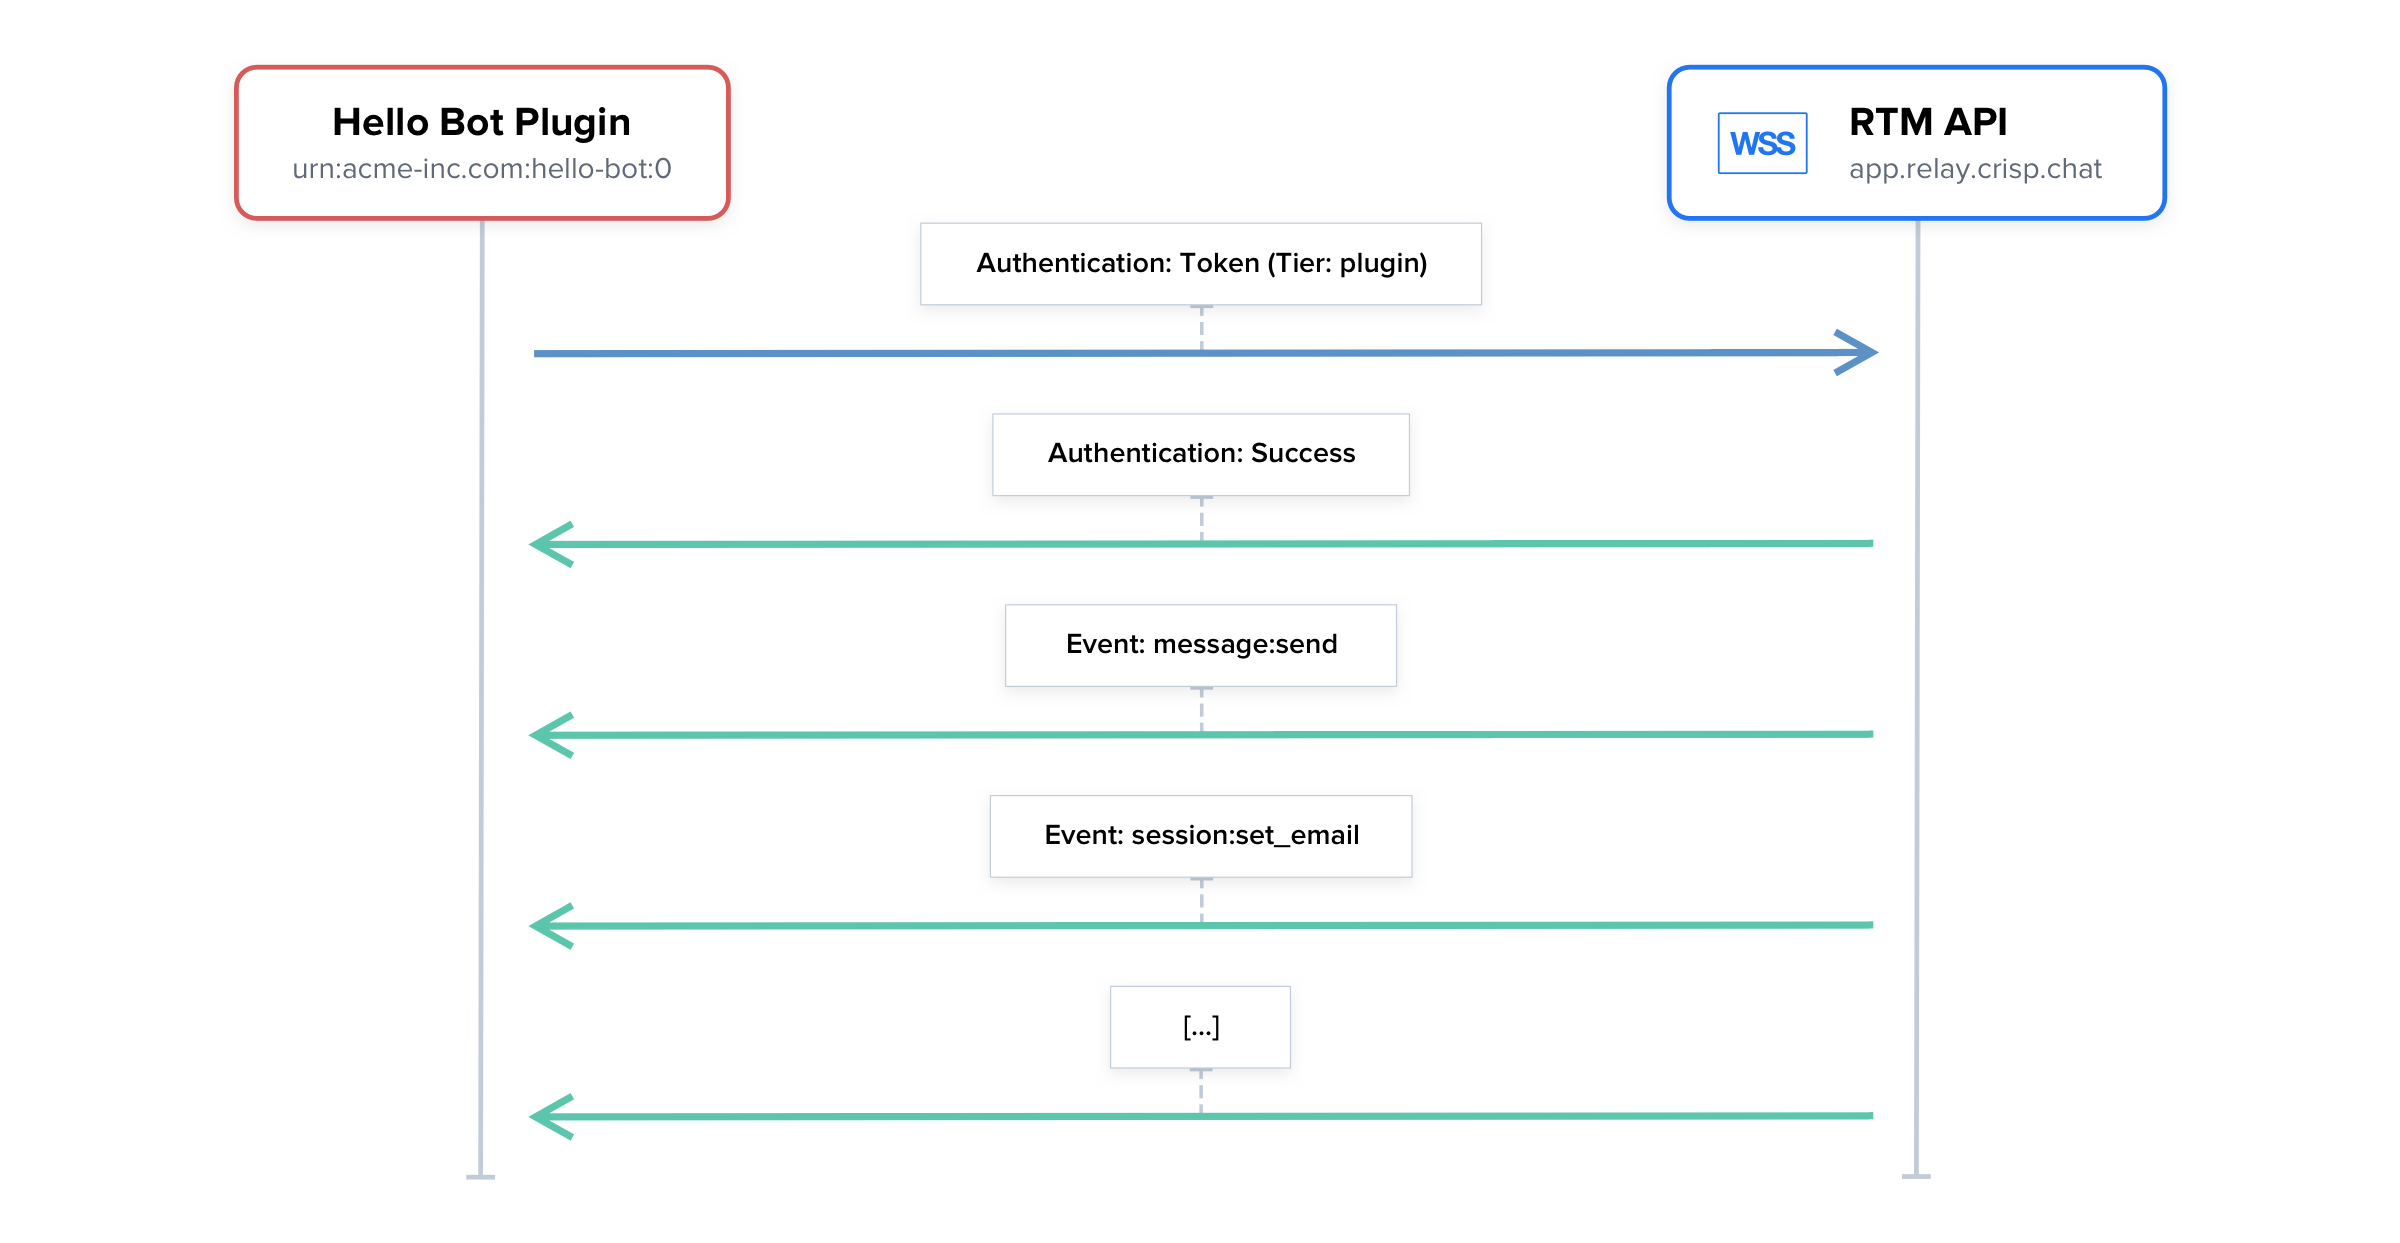
👉 The RTM API lets your integration receive real-time events such as messages, as they get received on the Crisp websites that your plugin has access to. Before events start flowing, you will need to authenticate yourself over the socket.
In-Depth Video Tutorial
Usage Flow
This is the lifecycle of a connection with the RTM API:
- Import your Socket.IO client library;
- Fetch the RTM API endpoint from the REST API (route: Get Connect Endpoints);
- Open a connection to the RTM API URL (that you fetched from the REST API);
- Once connected, send your tokens with the
authenticationpayload; - Optionally, filter events, rooms and inboxes you want to receive events for;
- Start receiving real-time events;
- (time passes...)
- Not willing to receive events anymore, teardown connection (disconnect);
How To Connect
Use a library
The most convenient way to connect with the RTM API is to use a RTM API-compatible library that we provide. Read our API Libraries guide to find a library for your programming language.
Let's provide an example on how you can receive events from the RTM API in your code.
node-crisp-api library.1. Import and configure the library
const Crisp = require("crisp-api");

// Create the Crisp client (it lets you access both the REST API and RTM events)
var CrispClient = new Crisp();

// Configure your Crisp authentication tokens ('plugin' token)
CrispClient.authenticateTier("plugin", "<token_identifier>", "<token_key>");

// Set current RTM mode to WebSockets
CrispClient.setRtmMode(Crisp.RTM_MODES.WebSockets);
2. Start listening for events
// <previous code eluded>

CrispClient.on("message:send", function(message) {
  // Filter on text messages
  if (message.type === "text") {
    console.info(
      "Got text message from visitor with content:", message.content
    );
  }
});
A full working code example can be found at: node-crisp-api/examples/events_websockets.js.
CrispClient.on() (if called). In the event that the provided authentication tokens are invalid, an error will be thrown.Direct usage (no library)
In case no library is available to you, it is still possible to use Socket.IO to open a connection manually, authenticate, and receive events. This is fairly easy, and holds in a few lines of code.
The WebSocket endpoint you will need to connect to can be fetched from the REST API. Note that the connection must be WSS (secure WebSocket), we do not support WS (insecure WebSocket) nor legacy HTTP long-polling.
1. Import Socket.IO
In package.json:
{
  "dependencies": {
    "socket.io-client": "4.4.1"
  }
}
In app.js:
import io from "socket.io-client";Please check the table below for the EIO protocol support matrix:
| Socket.IO Version | EIO Version | Compatible? | Notes |
|---|---|---|---|
socket.io-client 4.x |
EIO 4 | ✅ | Long-term support |
socket.io-client 3.x |
EIO 4 | ✅ | Long-term support |
socket.io-client 2.x |
EIO 3 | ✅ | Long-term support |
socket.io-client 1.x |
EIO 2 | ❌ | Deprecated |
socket.io-client 0.x |
EIO 1 | ❌ | Deprecated |
2. Connect to the RTM API
In app.js:
// <previous code eluded>

// Fetch the RTM API endpoint from the REST API, and parse it as an URL
// Important: replace '<endpoint-url>' with your dynamically-fetched URL
let _endpoint = new URL("<endpoint-url>");

// Create client
let _client = new io(_endpoint.origin, {
  path       : (_endpoint.pathname || "/"),
  transports : ["websocket"]
});

// Handle client events
_client.on("connect", () => {
  console.log("RTM API connected");
});

_client.on("disconnect", () => {
  console.log("RTM API disconnected");
});

_client.on("connect_error", (error) => {
  console.error("RTM API connection error", error);
});

// Handle IO events
_client.io.on("reconnect", () => {
  console.log("RTM API reconnecting...");
});

_client.io.on("error", (error) => {
  console.error("RTM API error", error);
});
3. Authenticate to the RTM API (and filter events)
In app.js:
// <previous code eluded>

_client.on("connect", () => {
  // <previous code eluded>

  // Authenticate to the RTM API
  this.emit("authentication", {
    // Configure your Crisp authentication tokens
    username : "<token_identifier>",
    password : "<token_key>",

    // Subscribe to target event namespaces
    events : [
      "message:send"
    ]
  });
});

// <next code eluded>

_client.on("authenticated", () => {
  console.log("RTM API authenticated");

});

_client.on("unauthorized", () => {
  console.error("RTM API unauthorized (token keypair is invalid)");
});
4. Handle events from the RTM API
In app.js:
// <previous code eluded>

// Listen for messages sent from visitors
_client.on("message:send", (event) => {
  console.log("Got message from visitor", event);
});
How To Authenticate
Once the WebSocket connection is open with the RTM API, you have about 10 seconds to authenticate with the server.
👉 Authentication is covered in our guide on RTM API Authentication.
authentication payload as soon as you open the connection with the RTM API.Subscribing To Events
Filter by event namespaces
Most integrations only need to subscribe to a handful of events from the RTM API, skipping a lot of them.
We recommend that upon connecting to the RTM API, you request to receive only the events that you require. This can be done upon sending the authentication payload, by adding an events property with the list of events you with to receive:
{
  // <other properties eluded>

  "events" : [
    // List of events to subscribe to, eg:
    "message:send",
    "message:received",
    "message:updated",
    "message:removed"
  ]
}
All our RTM API-compatible libraries let you filter events in a programmatic way, meaning that you do not have to send this authentication payload manually.
Filter by origin (websites)
In some cases, you may need to restrict the events that you wish to receive to originate from a subset of websites that are subscribed to your plugin. This is rather rare, but be aware that it is possible.
As done with event namespace filtering, append a rooms property to the authentication payload, as such:
{
  // <other properties eluded>

  "rooms" : [
    // List of website IDs to subscribe to, eg:
    "8c842203-7ed8-4e29-a608-7cf78a7d2fcc"
  ]
}inboxes value, containing the list of inbox identifiers for the websites you are bound to, to restrict events even further down to the inbox level.Re-binding filters later on
If you would like to update filtered event namespaces or website rooms after you authenticated, note that this is possible.
Simply send a socket:bind event with the following structure (this must be done when you are already authenticated):
{
  "events" : [
    // List of events to subscribe to, eg:
    // We added 'message:compose:send' there.
    "message:updated",
    "message:send",
    "message:received",
    "message:removed",
    "message:compose:send"
  ],

  "rooms" : [
    // List of website IDs to subscribe to, eg:
    // We removed '8c842203-7ed8-4e29-a608-7cf78a7d2fcc' and added '25320afc-33e9-436d-8296-6b89d2e0986b' there.
    "25320afc-33e9-436d-8296-6b89d2e0986b"
  ]
}Usage Considerations
Connection limits
To protect Crisp systems against abuse or human error, the RTM API will not allow too many connections to be open from the same IP address or authentication token.
If, for any new connection that you open with the RTM API, the server either disconnects you or you do not receive any event on the channel (ie. it stays silent), then you may have hit the limits.
In fact, most integrations will only require 1 single connection to be open with the RTM API, at any time. Opening more connections suggests that you may have made a mistake.
As we know human error can occur when implementing an API, those limits will actually reveal potential mistakes you made. For instance you may open a new RTM API for each single user of your integration (this is wrong) and not re-use a common RTM API connection for everyone (this is right).
Network errors
When implementing the RTM API, remember that you are connecting to an external server over the network, which may not be 100% reliable. Therefore, you must make sure to handle abrupt and polite disconnections accordingly, in which case you should schedule a reconnection attempt.
If you get disconnected, we advise that you implement a reconnection retry counter. The counter would be reset upon successfully reconnecting, and it would be incremented for each reconnection failure. You would attempt the first reconnection retry immediately after being disconnected, only to retry at slower and slower intervals if you still cannot reconnect. This ensures your systems behave in a polite manner with ours, and do not flood our servers with reconnection attempts.