To retrieve and send data on behalf of Crisp websites, you need to use the REST API. The REST API can be connected to over HTTPS.
This guide walks you through using the REST API. Note that the REST API can be used aside to the RTM API, which lets you receive real-time events associated to any action that you take with the REST API.
Overview Schematic
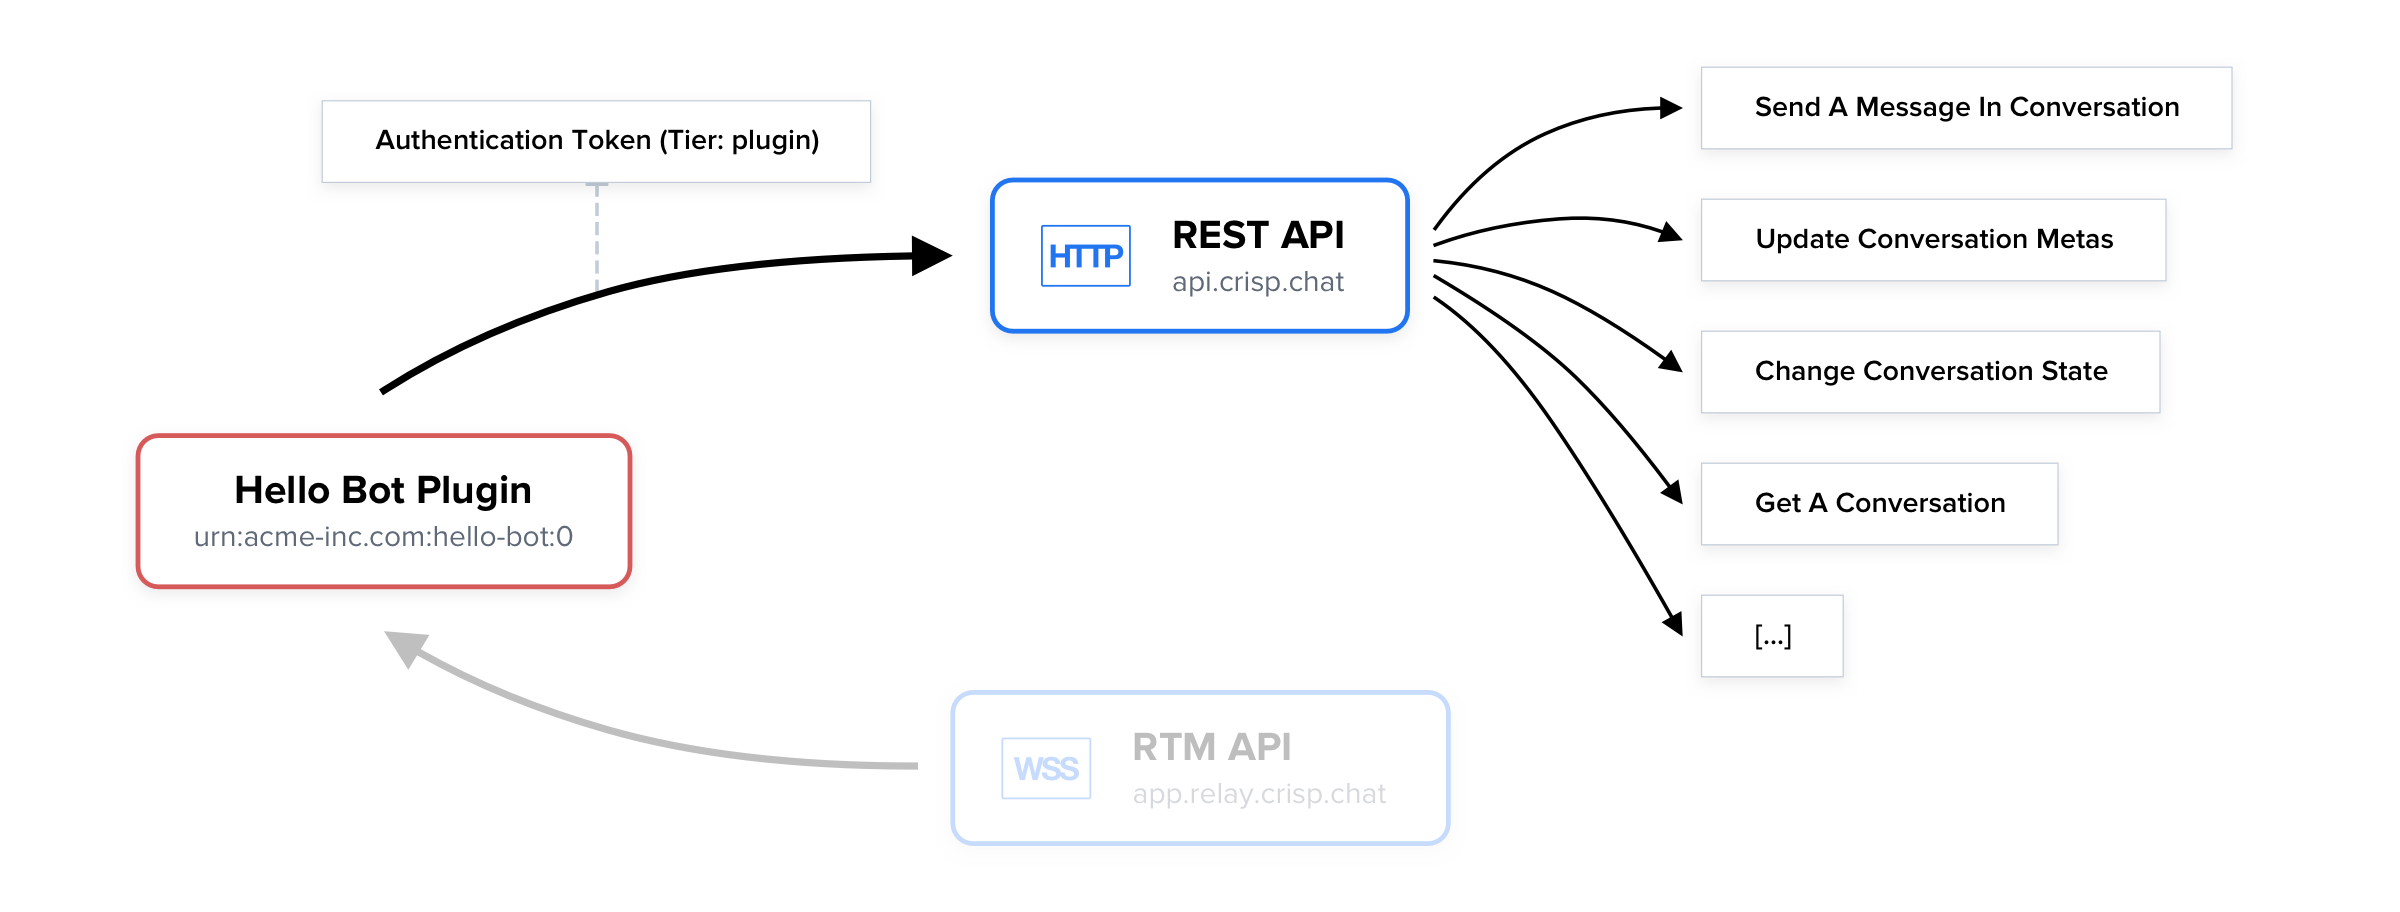
👉 The REST API lets your integration access features that regular Crisp operator users have access to, such as sending messages. Note that the RTM API, not covered in this guide, lets you receive real-time events, and can be used side by side with the REST API.
In-Depth Video Tutorial
How To Authenticate
For every request that you make to the REST API, you must submit your authentication token (identifier and key), as well as your token tier (here: plugin).
You will also need your website_id, which you can find thanks to this dedicated guide.
Crisp provides you two types of tokens: development token and production token:
- Development token is the best way to get started with the Crisp REST API. It allows you to easily generate a token key/identifier pair which can be used on all
plugintier routes without any scope restriction. Ideal for development and testing purposes, this token however has lower quotas and can only be used on your trusted website (your Crisp workspace). - Production token can be requested once you are ready to deploy your plugin into production (either publicly on our marketplace or privately for your own usage). This token requires you to submit the scopes of the routes used by your plugin and allows you to request customizable quotas to fit your needs.
Obtaining and using a Development token
To get started, you will want to register an account on our marketplace in order to create a plugin (your project) and generate your token:
- Head over to the Crisp Marketplace
- Sign in or create an account (this account is different from your main Crisp account)
- Once logged-in, go to Plugins and click on the New Plugin button
- Select the plugin type, in this case Private
- Name your plugin a name, eg. "My First Crisp Plugin", and hit Create
- On the plugin tab, go to Tokens and scroll down to Development Token to view (and manage) your token identifier/key pair
Before using your development token, you now need to associate your marketplace account to your Crisp workspace. This is done by specifying a Trusted Workspace:
- Go to the Settings of your Crisp Marketplace account
- Click on Add Trusted Workspace and submit your
website_id - Enter the credentials of your main Crisp account (the ones you use to access your main Crisp account) and then submit your 2FA token (if any is enabled)
- You're all done! You are now ready to use our REST API and start building your plugin
app.crisp.chat and you must be part of the workspace you wish to use the REST API on. Your team can invite you to their existing workspace if needed and grant you the Owner role.Obtaining and using a Production token
Obtaining a production token is the next natural step once you are ready to step into production with your plugin or if your usage requires higher quotas. To guide you on generating this token and authenticating properly, we have created a dedicated section in our documentation.
👉 Production token and Authentication is covered in our guide on REST API Authentication.
invalid_session error in this case.How To Use
Use a library
The most convenient way to use the REST API is to use a REST API-compatible library that we provide. Read our API Libraries guide to find a library for your programming language.
Let's provide an example on how you can make requests to the REST API in your code.
node-crisp-api library.1. Import and configure the library
const Crisp = require("crisp-api");

// Create the Crisp client (it lets you access both the REST API and RTM events)
var CrispClient = new Crisp();

// Configure your Crisp authentication tokens ('plugin' token)
CrispClient.authenticateTier("plugin", "<token_identifier>", "<token_key>");
2. Make requests to the API
// <previous code eluded>

// Send text message for `website_id` and `session_id`
// Note: replace '<website_id>' and '<session_id>' with your values
CrispClient.website.sendMessageInConversation(
  "<website_id>", "<session_id>",

  {
    type    : "text",
    from    : "operator",
    origin  : "chat",
    content : "This was sent from the REST API!"
  }
)
  .then(() => {
    console.info("Message has been sent.");
  })
  .catch((error) => {
    console.error("Message could not be sent, because:", error);
  });
A full working code example can be found at: node-crisp-api/examples/send_text_message.js.
Direct usage (no library)
In case no library is available, it is still easy to use the REST API using an HTTP library available for your programming language. As long as you are able to make requests in all available HTTP methods, set body content, and configure request headers, then you are good to go.
The HTTP endpoint base you will need to use is: https://api.crisp.chat/v1/. Note that all requests must be done via HTTPS (HTTP over TLS), we do not support HTTP (plain text HTTP).
The full list of HTTP routes available to you, as well as the data input that they expect, is available on the REST API Reference.
Also, we provide a Postman collection to make it easy for you to play with the Crisp REST API:

{identifier}:{key} with your token keypair (keep the middle : separator). Also, replace {website_id} with your website identifier, and any other value with {brackets}.Example 1: Get website details
curl https://api.crisp.chat/v1/website/{website_id} \
  --get \
  --user "{identifier}:{key}" \
  --header "X-Crisp-Tier: plugin"
Example 2: Send a text message
curl https://api.crisp.chat/v1/website/{website_id}/conversation/{session_id}/message \
  --user "{identifier}:{key}" \
  --header "Content-Type: application/json" \
  --header "X-Crisp-Tier: plugin" \
  --data '{ "type": "text", "from": "operator", "origin": "chat", "content": "This was sent with cURL!" }'
Note that --post does not need to be passed there, as cURL assumes it implicitly if --data is being used.
invalid_session error. More information is available in our REST API Authentication guide.Usage Considerations
Rate-limits (quotas)
The REST API is subject to rate-limits and daily quotas to protect our systems against abuse. It guarantees that the REST API stays as fast and responsive as possible for all Crisp users.
Daily quotas are explained in-depth in the guides on Rate-Limits and Authentication.
Submitted data
Whenever you submit data to the API using POST, PUT or PATCH, it gets validated against a data schema.
The REST API Reference specifies the data format that schemas enforce, within the Data Structure section, for each request.
Whenever you submit data to the REST API, if it gets rejected by schema validators, you will receive the following response error: invalid_data. A message may also be provided, with explanations of what you did wrong.