Looking to add a Chat SDK to your Android mobile app? Start with Crisp today and elevate your customer support with our Android Chat widget — Install it in just a few steps.
The Crisp Chat SDK allows you to add a chat widget to your Android mobile app, enabling your customers to engage with your brand and easily communicate with your team. Just discovering Crisp and our SDK? You can learn more about our Chat SDKs right here.
Video Tutorial
Installation
1. Get your Website ID
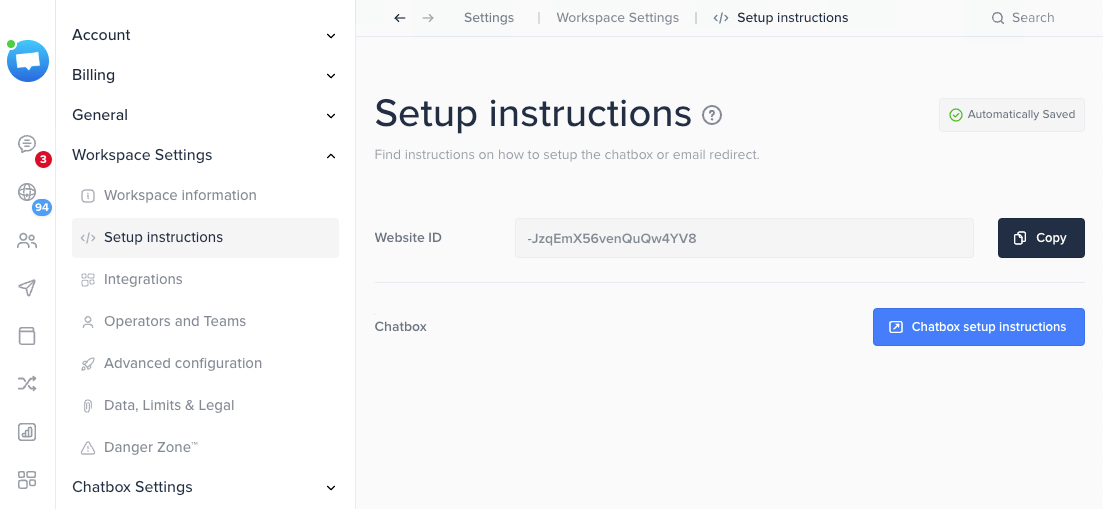
Go to your Crisp Dashboard, and copy your Website ID:

Error starting chat errors. This setting can be found in Settings > Website Settings > Chatbox & Email Settings > Chatbox Security.2. Add Crisp dependency
Add the Crisp Android Chat SDK in your dependencies:
dependencies {
    implementation 'im.crisp:crisp-sdk:2.0.13'
}
3. Setup multidex
Configure your app for multidex:
android {
    defaultConfig {
        multiDexEnabled true
    }
}
dependencies {
    // If you're using AndroidX
    implementation 'androidx.multidex:multidex:2.0.1'
    // If you're not using AndroidX
    implementation 'com.android.support:multidex:1.0.3'
}
4. Initiate the application class
Initialize the library in your Application subclass:
// Replace it with your WEBSITE_ID
// Retrieve it using https://app.crisp.chat/website/[YOUR_WEBSITE_ID]/
Crisp.configure(getApplicationContext(), "7598bf86-9ebb-46bc-8c61-be8929bbf93d");
5. Include Crisp in your activity
You can for instance start Crisp after a click on a button:
Intent crispIntent = new Intent(this, ChatActivity.class);
startActivity(crispIntent);
6. Configure your app to receive Crisp notifications
This step is fully covered in the Notifications section.
7. Add Crisp authority and path to your FileProvider, if any
AndroidManifest.xml:
<provider
    android:name="androidx.core.content.FileProvider"
    android:authorities="${applicationId}.fileprovider;${applicationId}.im.crisp.client.uploadfileprovider"
    android:exported="false"
    android:grantUriPermissions="true"
    tools:replace="android:authorities"
>
    <meta-data
        android:name="android.support.FILE_PROVIDER_PATHS"
        android:resource="@xml/file_paths"
        tools:replace="android:resource"
    />
</provider>res/xml/file_paths.xml:
<files-path name="crisp_sdk_attachments" path="im.crisp.client/attachments/" />Availables APIs
Java APIs
The extensive Java documentation is available here.
Crisp.configure(Context applicationContext, String websiteID)— Configures Crisp SDK with your websiteIDCrisp.configure(Context applicationContext, String websiteID, boolean resetToken)— Gives the option to reset thetokenIDwhile setting thewebsiteIDCrisp.configure(Context applicationContext, String websiteID, @Nullable String tokenID)— Optionally (re)sets thetokenIDwhile setting thewebsiteIDCrisp.setTokenID(Context applicationContext, @Nullable String tokenID)— Assigns the next session with a tokenIDCrisp.resetChatSession(Context applicationContext)— Reset the sessionCrisp.getSessionIdentifier(Context)— Returns the sessionIDCrisp.setUserEmail(String email)— Sets the user email (note: if email is invalid, this method will return false and the value will not be set)Crisp.setUserEmail(String email, String signature)— Sets and optionally verifies the user email if valid (as part of the Identity Verification feature)Crisp.setUserPhone(String phone)— Sets the user phone (note: if phone is invalid, this method will return false and the value will not be set)Crisp.setUserNickname(String nickname)— Sets the user nameCrisp.setUserAvatar(String avatar)— Sets the user avatar (note: if avatar is invalid, this method will return false and the value will not be set)Crisp.setUserCompany(Company company)— Sets the user companyCrisp.setSessionBool(String key, boolean value)— Sets a session data booleanCrisp.setSessionInt(String key, int value)— Sets a session data integerCrisp.setSessionString(String key, String value)— Sets a session data stringCrisp.setSessionSegment(String segment, boolean overwrite)— Sets a session segment and optionally overwrite existing ones (default is false)Crisp.setSessionSegments(List<String> segments, boolean overwrite)— Sets a collection of session segments and optionally overwrite existing ones (default is false)Crisp.pushSessionEvent(SessionEvent event)— Pushes a eventCrisp.pushSessionEvents(List<SessionEvent> events)— Pushes a collection of eventsCrisp.searchHelpdesk(Context applicationContext)— Opens the Helpdesk search tabCrisp.openHelpdeskArticle(Context applicationContext, String id, String locale, @Nullable String title, @Nullable String category)— Displays the targeted article (optionally sets a title and category)Crisp.addCallback(EventsCallback callback)— Registers a callback for chatbox eventsCrisp.removeCallback(EventsCallback callback)— Unregisters a callback for chatbox eventsCrisp.showMessage(Content content)— Shows a local message sent from an operator in the chatbox
Important notes
setUser, setSession, showMessage and pushSessionEvent methods are performed right away if the chat is already ongoing, when the session is joined, or if you call either of configure (with a different websiteID than the current one) or resetChatSession.helpdesk methods are performed right away if the chat is already ongoing, on the next opening, or if you call either of configure (with a different websiteID than the current one), resetChatSession or any other helpdesk methods.configure(Context, String) or configure(Context, String, String) with a null tokenID value will set it to null. This means that calls to setTokenID must be done after configure and before starting ChatActivity, otherwise the session will be created without it and you will need to call resetChatSession afterwards. Calls to configure and setTokenID are ignored if the chat is already ongoing.Notifications
1. Create a Firebase project and add it to your Android app
In order to complete this step, follow the Firebase Get started guide.
At the end of it, also add the following dependency to your module (app-level) build.gradle file.
dependencies {
  implementation 'com.google.firebase:firebase-messaging'
}
2. Enable Push notifications in Crisp dashboard
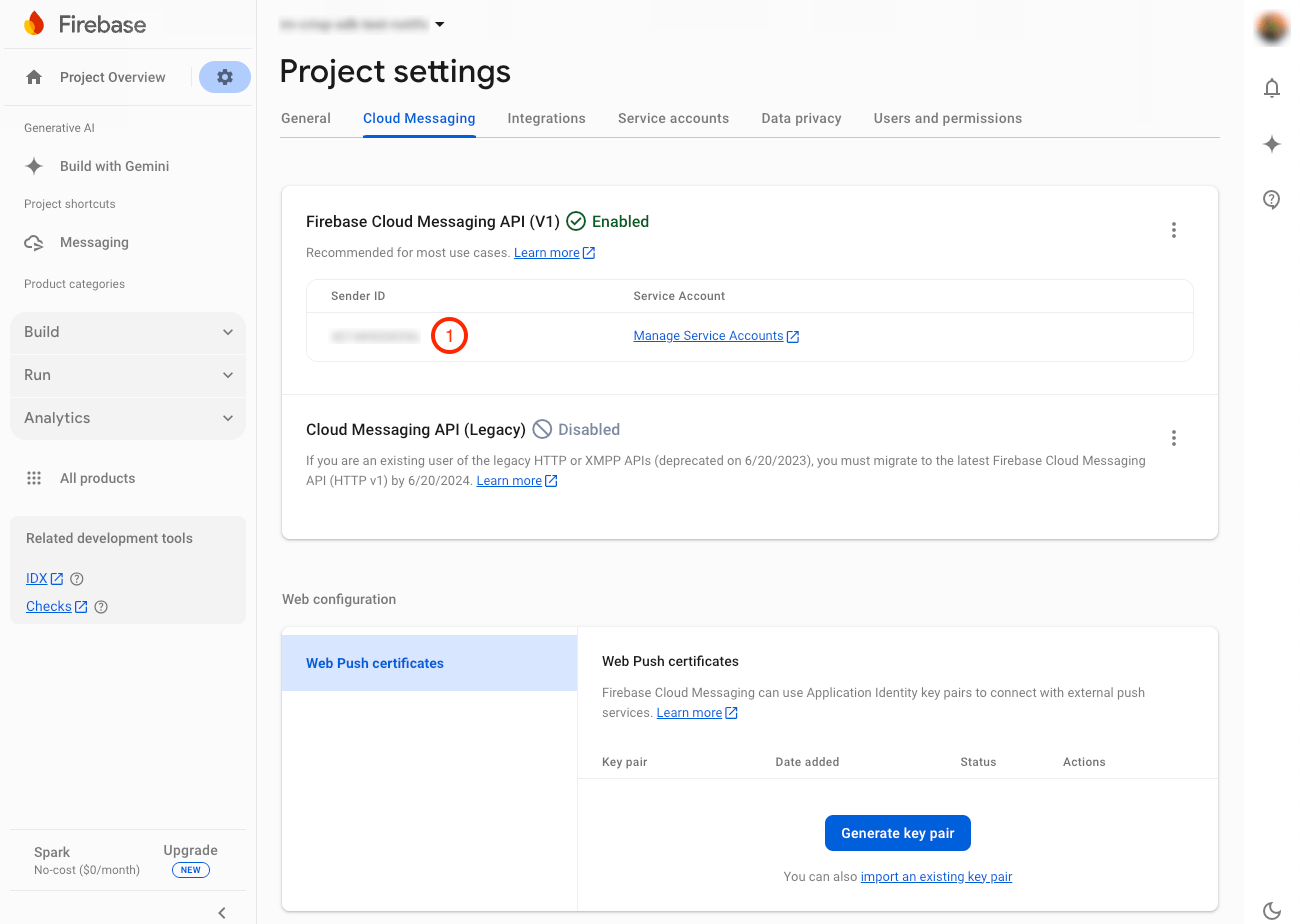
- Go to your Firebase Project settings,
- Go to the Cloud Messaging tab,
- In the Firebase Cloud Messaging API (V1) section, copy your Sender ID (1), you will need it later.

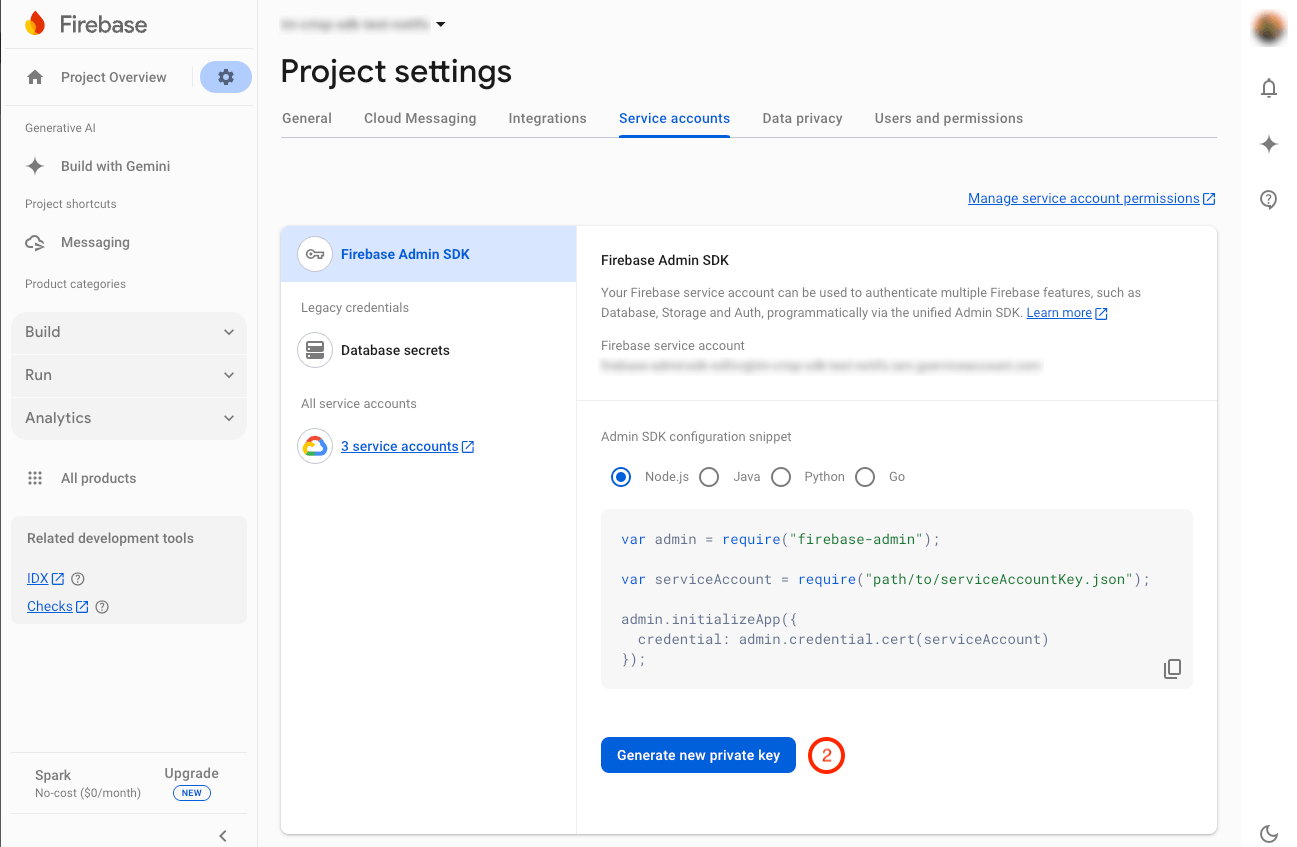
- Go to the Service accounts tab,
- In the Firebase Admin SDK section, click on the Generate new private key (2) button and save it for later.

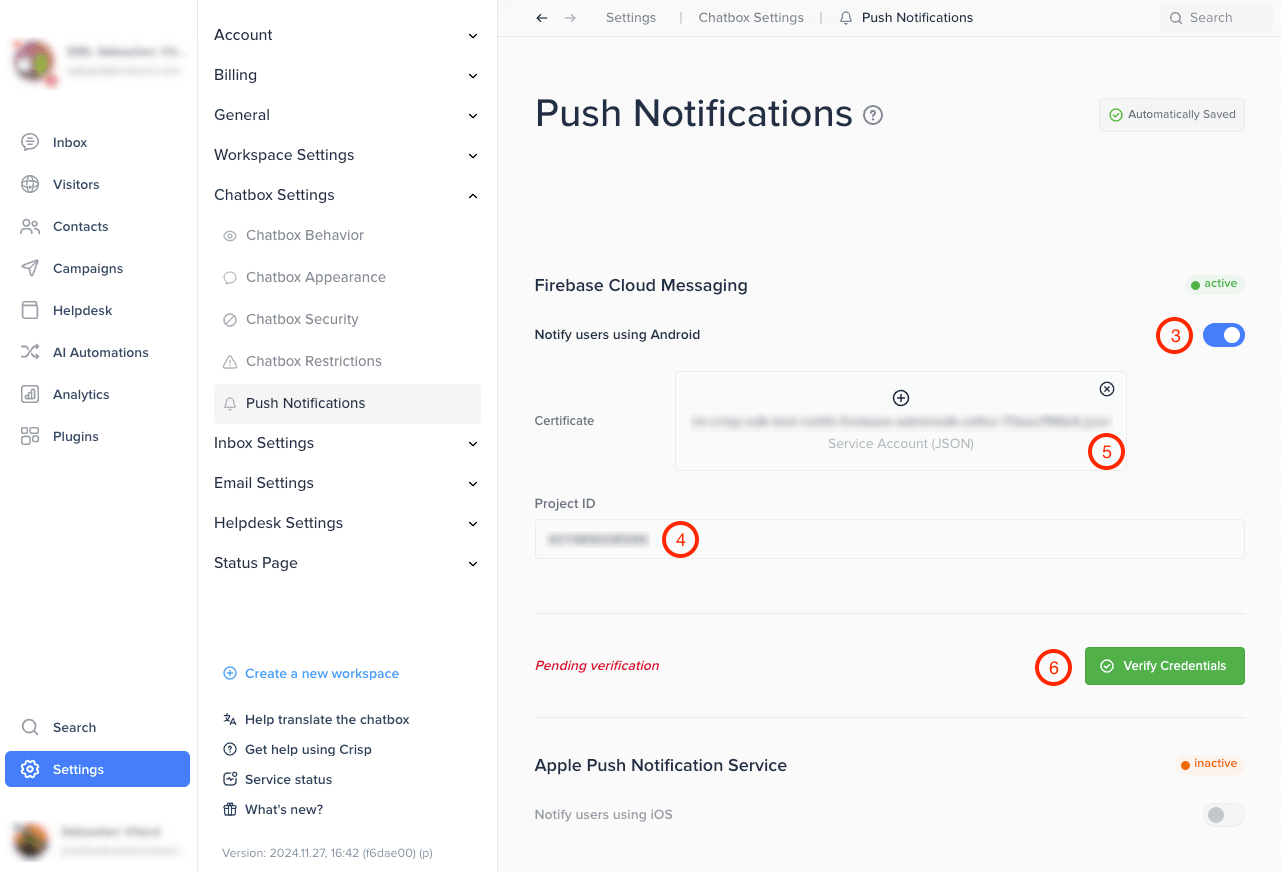
- Go to your Crisp Dashboard,
- Select your Workspace,
- Go to Settings > Chatbox Settings > Push Notifications,
- Under the Firebase Cloud Messaging section :
- Enable the Notify users using Android (3) option
- Paste the Sender ID you have copied previously into the Project ID (4) field
- Select or drag your Firebase Admin private key file you have downloaded earlier in the Certificate (5) box
- Click on the Verify Credentials (6) button

- Crisp will notify you that it is checking FCM Credentials in order to send notifications to your users.

Finally, if FCM Credentials are valid, Crisp will update the Push Notifications status to live.
3. Handle Push notifications in your Android app
We tried to satisfy every user so we provide you 2 ways of handling notifications:
- the minimalist one where you just have to open the chatbox when your user taps the notification,
- the complete one where you can also handle your own notifications.
Note: in the following steps, MainActivity will refer to the Activity class declared in your AndroidManifest.xml as the main entry point of your app (i.e. the one with the android.intent.action.MAIN action as an intent-filter tag).
3.1. For Crisp only
We have made it the most straightforward as possible for you to notify your users.
You just have to declare our CrispNotificationService in the application tag of your AndroidManifest.xml.
<application>
  <service
    android:name="im.crisp.client.external.notification.CrispNotificationService"
    android:exported="false">
    <intent-filter>
      <action android:name="com.google.firebase.MESSAGING_EVENT" />
    </intent-filter>
  </service>
</application>
Notifications will be handled by our CrispNotificationService and a tap on it will launch your MainActivity and open our ChatActivity with the corresponding session.
If you want to modify this behavior, you can jump to the next step.
3.2. For Crisp and yours
As above, you can declare or have already declared your own service class extending the FirebaseMessagingService in your AndroidManifest.xml.
In order for Crisp to display its own notifications, you have to make a few adjustments to it.
@Override
public void handleIntent(Intent intent)
{
  // Filters incoming notification intents, rejecting any Crisp notification targeting a session which does not exist in the Crisp cache
  if (! CrispNotificationClient.isCrispIntent(this, intent)
      || CrispNotificationClient.isSessionExist(this, intent))
  {
    super.handleIntent(intent);
  }
}

@Override
public void onMessageReceived(@NonNull RemoteMessage message)
{
  // Filters incoming notification messages and forward the handling if it is a Crisp one
  if (CrispNotificationClient.isCrispNotification(message))
  {
    CrispNotificationClient.handleNotification(this, message);
  }
  // Else, handle your own notifications
  else
  {

  }
}

@Override
public void onNewToken(@NonNull String token)
{
  // Forwards the FCM Token to Crisp to register the device to receive notifications
  CrispNotificationClient.sendTokenToCrisp(this, token);
 }
We have made available several CrispNotificationClient.handleNotification methods for you to customize how your app will handle them:
CrispNotificationClient.handleNotification(Context context, RemoteMessage message): will launch yourMainActivityand open ourChatActivitywith the corresponding session, it is the default behavior as described in the previous step,CrispNotificationClient.handleNotification(Context context, RemoteMessage message, boolean openChatbox): like the one above but letting you choose either or not launch ourChatActivityautomatically,CrispNotificationClient.handleNotification(Context context, RemoteMessage message, @Nullable TaskStackBuilder backStack): will launch thebackStackyou provide us and open ourChatActivitywith the corresponding session,CrispNotificationClient.handleNotification(Context context, RemoteMessage message, @Nullable TaskStackBuilder backStack, boolean openChatbox): like the one above but letting you choose either or not launch ourChatActivityautomatically.
If you have decided to not open our ChatActivity automatically, you can proceed with the next step to handle the tap on a notification.
3.3. Open the chatbox on notification tap
When user taps a notification and you have chosen to not open our ChatActivity automatically, the notification Intent is dispatched to the Activity you have selected, either your MainActivity or the latest one in the BackStack you have provided. You can add this minimalist code to open the chatbox from it.
@Override
protected void onCreate(@Nullable Bundle savedInstanceState)
{
  super.onCreate(savedInstanceState);

  reloadFromIntent(getIntent());
}

@Override
protected void onNewIntent(Intent intent)
{
  super.onNewIntent(intent);

  reloadFromIntent(intent);
}

private void reloadFromIntent(Intent intent)
{
  // Tries to open the Crisp chatbox from the intent, returning true if it succeeds, false otherwise.
  if (! CrispNotificationClient.openChatbox(this, intent))
  {
    // If it fails, it means that:
    //   - intent is not a Crisp notification,
    //   - corresponding session does not exist in cache.
    // If so, you can proceed with your own app logic.
  }
}
4. Customize Push notifications
We have made Push notifications customizable in 3 ways: color, icon and sound.
For the first two, you can update them from your AndroidManifest.xml as you would do with Firebase.
<application>
  <meta-data
    android:name="com.google.firebase.messaging.default_notification_icon"
    android:resource="@drawable/my_notification_icon"
    tools:replace="android:resource" />
  <meta-data
    android:name="com.google.firebase.messaging.default_notification_color"
    android:resource="@color/my_notification_color"
    tools:replace="android:resource" />
</application>
For the sound, you can add a raw resource named crisp_chat_message_receive to your app which will be played upon notification receipt.
Examples of Crisp implementation on Android apps
If you are looking for real-world examples from our customers, we've got just what you need. Below is a hand-picked selection of Android apps which showcase how our chatbox integrates on Android devices.
- RunMotion Coach — is a running planner application to help meet your objectives
- Bibit — helps you take financial decisions and prepare investments
- Emma-app — serves as a friendly budget management and financial companion
- Savvy Navvy — acts as your own digital coral reef to prepare against the tides